How to Make Mini Foam Board Party Bags
Recipients will love the gift bag as much as the gift inside!
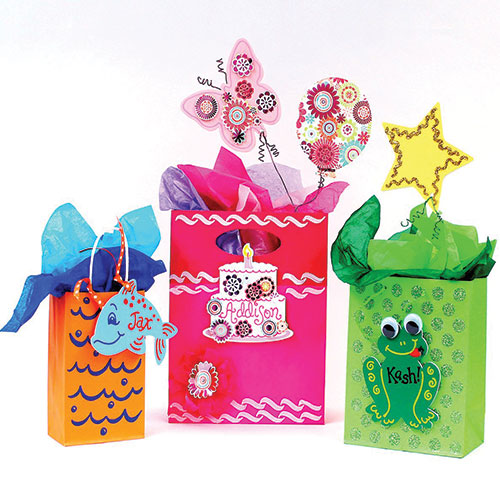
Supplies Needed (For orange bag:)
Supplies Needed (For green bag:)
Supplies Needed (For pink bag:)
Supplies Needed (For all:)
Instructions (For orange bag:)
- Place orange gift bag on work surface and use blue Painters® Opaque Paint Marker to draw rows of waves and dots on bag. Referring to photo, use pencil to lightly draw features and personalize Dolphin Foam Board Shapes™. Then redraw with orange and blue Painters®. Let dry.
- Use paper punch to punch a hole in Dolphin’s dorsal fin. Use Multi-Material Scissors to cut two 9″ lengths orange dot ribbon. With one length, tie Dolphin to one side of bag handle. Tie and knot other ribbon to opposite side of handle. Diagonally trim ribbon ends to desired lengths. Fill bag with tissue paper and gift.
Instructions (For green bag:)
- Referring to photo, use pencil, then citron Painters®, to draw details and personalize Frog Foam Board Shape™ using Black Painters®. Fill in frog’s mouth with Red Painters®. Let dry.
- Use CraftBond® Glue Spots to attach wiggle eyes. Use CraftBond® Quick Dry Glue to attach plastic fly to end of tongue. Use two layers of CraftBond® Foam Mounting Tape to attach Frog, centered, on bag front.
- To decorate Star Foam Board Shape™, apply Quick Dry Glue in a squiggle line about 1/4″ from outside edge of Star. Place Star on copy paper. Generously apply Project Popperz® Glitter, and then shake off excess onto copy paper. (Hint: Fold copy paper to return excess glitter into container.) Let dry.
- Use paper punch to punch hole in one Star point. Thread 4″ of a 15″ long wire through hole and twist back on itself to secure. Wrap each wire end around pencil to curl. Straighten about 6″ of long end of wire and use glue gun to glue straight end to inside back of gift bag. Fill bag with tissue paper and gift.
Instructions (For pink bag:)
- Referring to photo, practice using white Super Tip Painters® Marker on copy paper (or colored scrap paper) to draw decorative border pattern. (Tip: Hold Tip in one position to create thick and thin areas in each stroke.) After comfortable with the look, draw rows on flattened bag. Let dry. Use pink and lilac Painters® to decorate and personalize Cake Foam Board Shapes™, and lilac Painters® to outline Butterfly Foam Board Shapes™. Use yellow Painters™ to paint candle flame. Let dry.
- Use pencil to trace Balloon Foam Board Shape™ on back of scrapbook paper and use Multi-Material Scissors to cut out. Use CraftBond® All Purpose Glue Stick to glue paper balloon to front of Foam Board balloon.
- From remaining scrapbook paper, use Multi-Material Scissors to cut out several individual flower motifs in various sizes. Use Glue Stick and/or Foam Mounting Tape, for added dimension, to attach paper flowers to front of Cake and Butterfly. Use two layers of Foam Mounting Tape to attach Cake to bag front and to attach paper flower to center of ribbon bow. Use Foam Mounting Tape to attach bow to lower left front of bag.
- Punch hole in bottom of butterfly. Use wire cutter or pliers to cut 15″ length wire. See Step 5 to attach wire to butterfly and attach to bag. For antennae, fold a 6″ length wire in half and curl ends around pencil. Remove pencil and hot glue to back of Butterfly head.
- For balloon, wrap remaining 15” length wire around base of balloon and twist carefully to secure. Fill bag with tissue paper and gift.